Bass 5 Overhaul
|
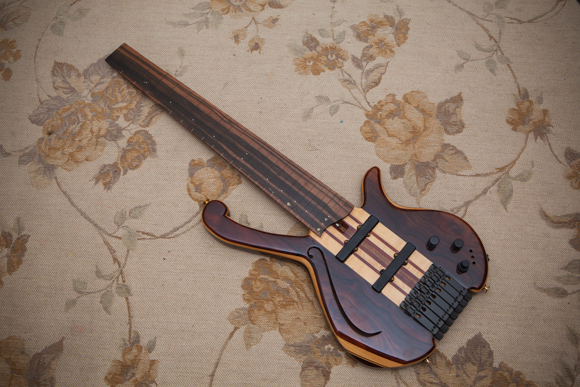
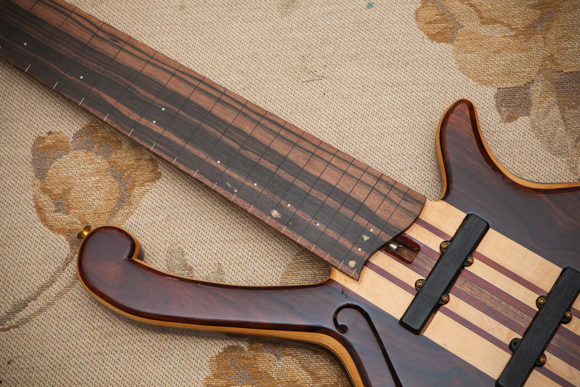
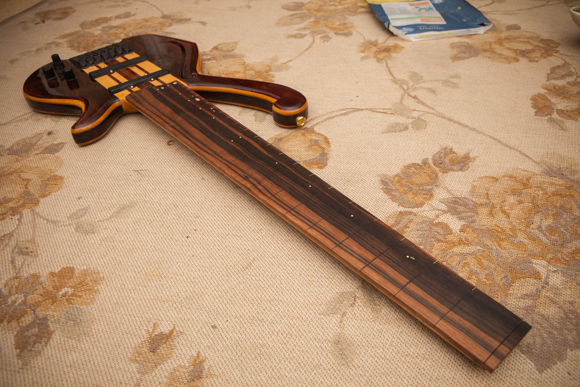
October 2015 This bass has had two fingerboards so far and unfortunately the last fingerboard was a little too thin to provide the correct string height to the bridge. So it needs another fingerboard. Which sounds fine, but unfortunately that means having to removed the old one! Easier said than done. I've bought a very thick piece of santos rosewood. It's a guitar neck billet, so it's slightly longer, 4" wide and nearly 1" thick! I should be able to get what I need from that plank! But after consideration, I think I'll use one of the two Macassar Striped ebony boards I've been holding in stock for the last 11 years! Fingerboard removal is a really tedious and uncomfortable procedure. It's done using an iron, an ironing table, a lot of heat and a really lot of steam. It takes about 20 mins for a 4 string bass fingerboard. ..so who knows how long this will take! An iron is used, yes a simple house hold iron us used to apply a lot of heat and steam into the fingerboard. After a rather long time, the glue which binds the fingerboard to the neck begin to loosen. A plastic scraper is then wedged between the neck and board, which is then worked carefully but with some effort along the neck, applying more heat and steam as it travels up the neck. Slowly but surely it comes free, half a fret at a time. Starting at the thinnest end and working my way to the widest point. The relief when the board finally comes free is substantial. 45 mins later, burnt fingers, a sore back, the air is rather blue form expletives, a stiff neck and an ironing board cover which needs a wash! The fingerboard finally came free. It was a really clean removal and the neck just needs a little redressing. Same with the fingerboard, surprisingly ...I could reuse it, although there is some clear water damage to it. The truss rod needs a new fillet, the old one is still stuck to the underside of the old fingerboard. I still have the MDF templates I used to cut the first board out. I can reuse it again for this new board. I'm seriously thinking of fretting this board and making a fretless with the 2nd fingerboard blank I have. This bass was always intended to be a pair, a fretless and fretted and all of the woods are paired. The book matching cocobolo was a 4 way book match top and bottom, so I can literally build a near identical twin. But I'm not expecting to build the other bass for a little while, certainly not this year. So I'm thinking that is this one becomes fretted, I'll use it a lot more in church and it'll take the pressure off me to make the other bass. I've bought a new head piece for this bass. A lot has changed in the bass hardware industry since I built this bass (I believe this is the first 7 string headless ever made). It was so unusual at the time, I had to get the headpiece custom made for me and it never really fitted properly to this particular bass. The design was sound but I had a fixing issue with it on this bass. 11 years on, I can buy an off the shelf head piece for it and for tuners / bridge units, I have several options (ABM, Hipshot ect). Either complete systems or individual units. The new head piece is very similar to the one Rob designed at Status Graphite. It's a little thinner and a bit heavier. It's not quite so good with single ball strings. But it's an improvement over what I was using. The only trouble is that I need a slightly longer neck, so I'll need to add a 2" extension to it. Thankfully, I have enough off cuts from the original neck billet to craft this as an exact match. The electrics and electronics on this bass are fine. They work great, although there is always room for improvement and there's something weird going on with the pan control. It seems to be panning between series and parallel with out of pahse in the middle. Very unusual!
|
|
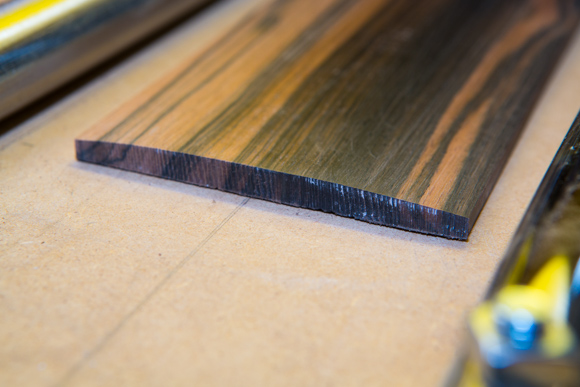
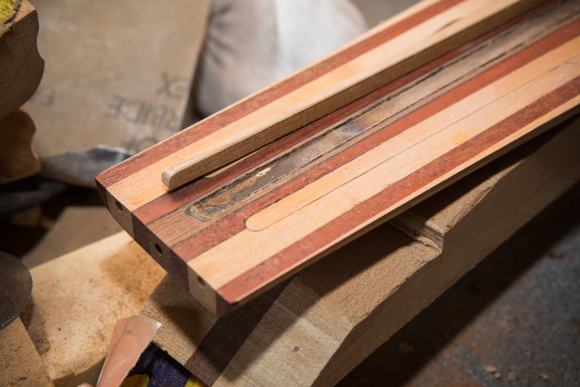
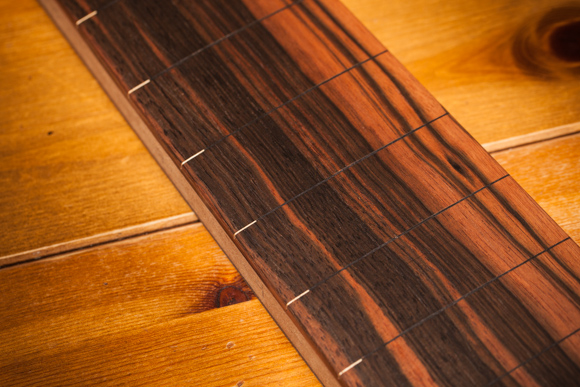
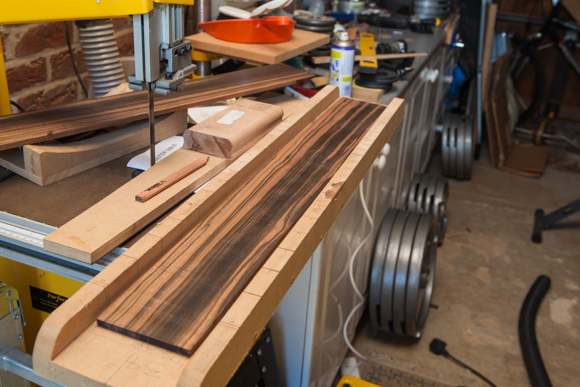
This is a freshly plained pair of Macassar Striped Ebony fingerboards - Fresh out of my Thicknesser. The next job is the sand a 16" Radius to the top surface. Not an easy job with a 4" wide fingerboard
|
Diary: November 2016 The first task was to pass the finger board blank through my thicknesser to even out the board and create a flat and even blank to work from.
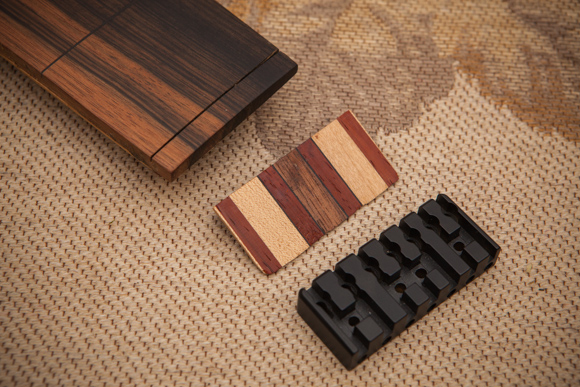
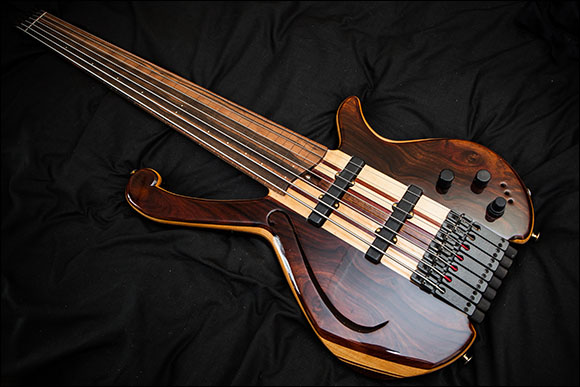
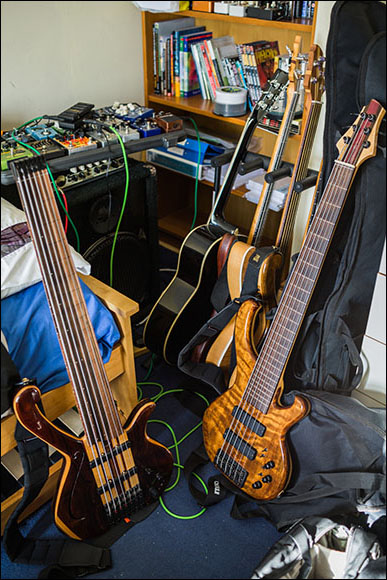
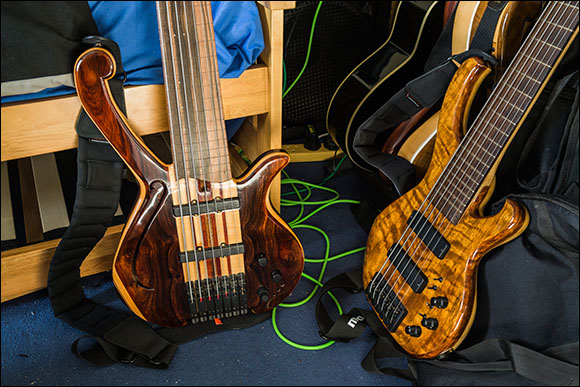
I have two extra wide bass boards in Striped Macassar Ebony, which look amazing and could easily do a 7 string bass. Just over 4" wide and cut for me specifically for this bass and it's planned twin...about 12 years ago.
I passed the blanks through the thicknesser on both sides to ensure both top and bottom are smooth and level. Now I have a choice of which board to choose. I'm sticking with a fretless board for this bass. It was it's original intention and my only other fretless is my 4 string. This bass will have flat wound strings!
After the plaining was complete, I marked out the fingerboard shape using a routing template which I used to make the last fingerboard for this bass. |

|
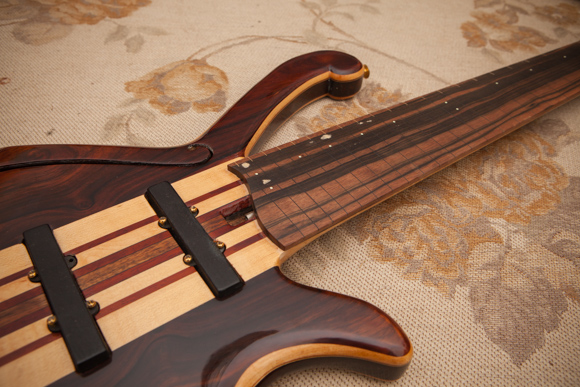
One 16" radius fingerboard blank, next it'll need some fret slots. I've decided to keep this bass as a fretless. After completing my Bolt on 6 string fretted bass, I now have a really good fretted sixer and that is covering church duties fine at the moment. I remembering that this fretless bass has such a lovely singing fretless sound. Very clear and articulate. I got a few notes out of it before the neck extension / end cap broke off! It has it's own voice, probably due to the strange pickup choice I asked for. The pickups were custom made and hand wound for me by the illustrious Kent Armstrong. I asked for a Music man sound if they were wired in series. I also asked for each single coil to be hum cancelling and I wanted them in Jazz style shells...Well that's what I certainly got! Although they look like jazz pickups...they are infact hum cancelling single coils from 1/2 of a Music man pickup. The magnet and coil windings are based on a Lane Poor concept which is similar to the early music man pickups, a low number of windings and lighter magnet than usual. Which is then buffered by the on board active EQ and pre-amp. It's bright but still warm sounding, it's very clear like a lane poor pickup. |
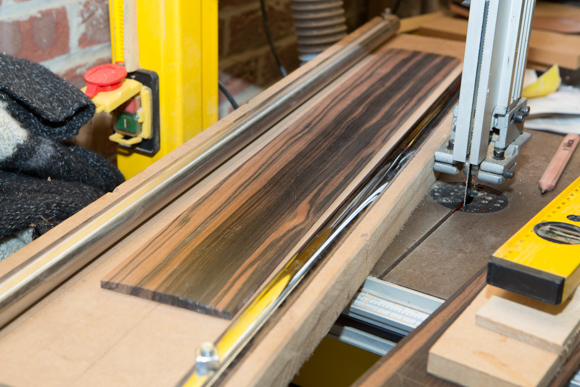
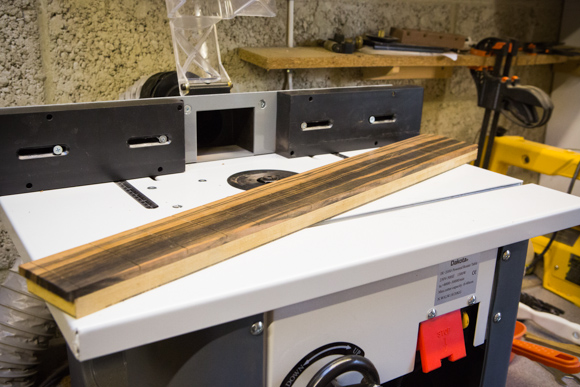
The next task was the most daunting...making the 16" radius. The ultra wide 4" board and the very hard striped ebony will make this a challenge. So I removed much of the material using my 16" radius routing jig. It's not ideal and it leaves a lot of rough marks on the board, which has to be tediously sanded out later.
The finish sanding took 3-4 long evenings using 40 / 60 / 120 grit papers and I'm reasonably happy with the results. The problem such a wide fingerboard is that it exposes my wood craft and the deficiencies of such a heavily grained piece of wood. The dark stripes are harder than the the lighter brown ones...which makes problems crating a truly flat surface. Sanding makes it worse, because the slightly softer grain erodes faster than the darker stripes.
Scraping helps a lot but a narrow angle is needed or the wood will tear.
What I really need is a 16" radius scraper that is 4" wide! That would be awesomely useful in this situation! |
|
|
After getting the board radius to a state I am happy with it, it was time to turn my attention to the joining surface on the bass neck. The glue residue needed careful sanding and scraping to get back to the wood but not thin the top surface of the neck anymore. Hey...it's thin enough.
Next, I prepared the maple fillet to seal off the exposed truss rod. Once glued, it was left for a few days to dry and then plained and scraped back to a level surface.
The plaining was complete, I marked out the fingerboard shape using a routing template which I used to make the last fingerboard for this bass.
|
|
|
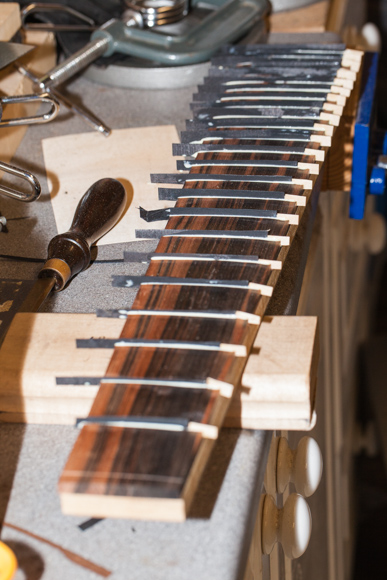
The next task was to start on the fret slotting. I thought about making this an unlined fretless...then the reality of my playing abilities and the width of the neck caused me to re-chose fret lines again.
Black fret lines would look best, but they are very hard to see on a dark stage and in some cases, completely disappear in the black areas.
Brown...or maple....hmmm. I think it's going to have to be maple lines again.
With a lined fretless, I don't have to worry so much about fret tang width.
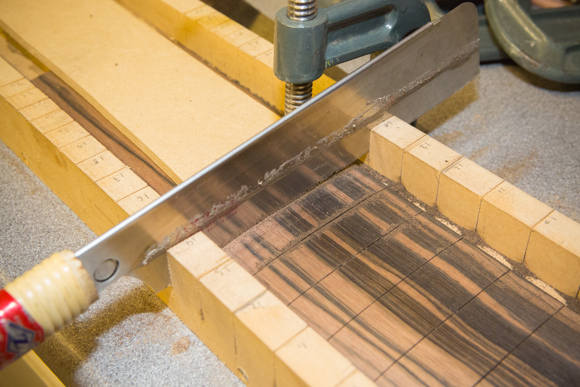
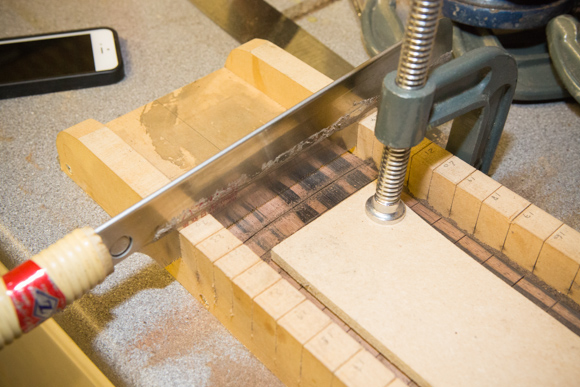
I use my old trusty 34" slotting jig. It's not ideal and there are better commercial options available these days. The only problem is that none of them can cater for an ultra wide 4" bass finger board.
The Japanese back saw makes light work of the maccasan ebony cross grain. |
|
|
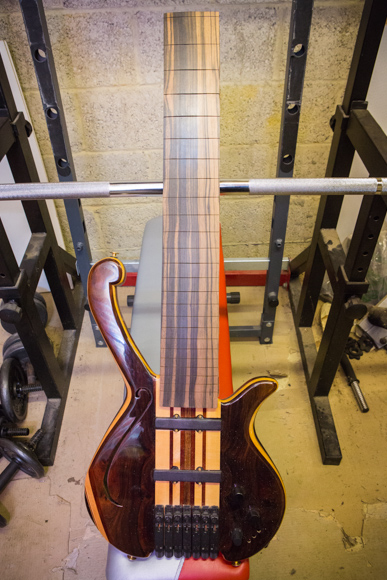
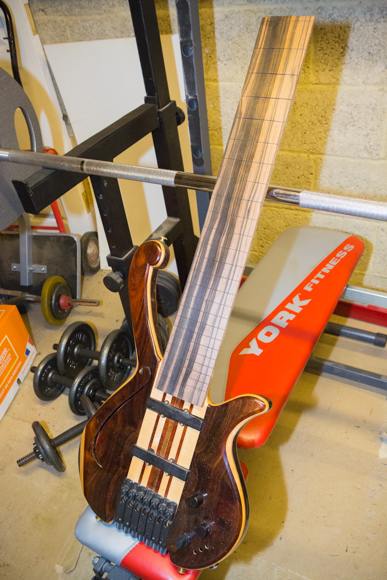
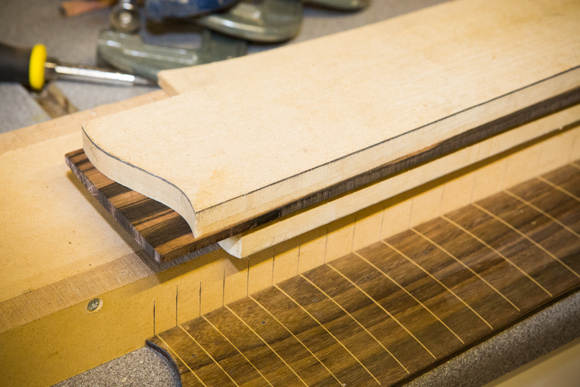
The fingerboard blank is taped to the bass here using double sided tape. I like to fit things and see how they will look.
I think this striped ebony is going to look really nice on this bass. |
|
|
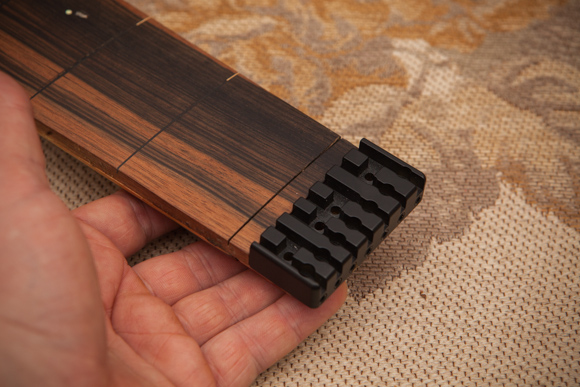
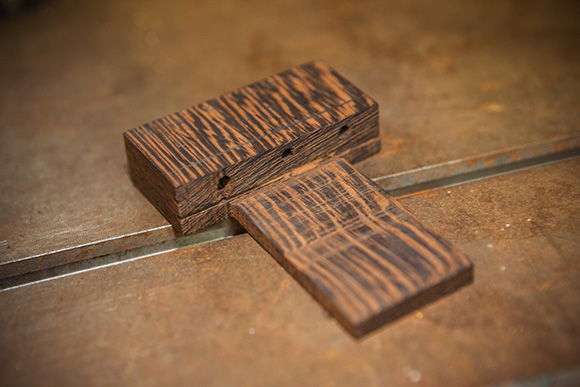
I fitted the slotted and radiuses fingerboard to an MDF fingerboard template which I made from the old fingerboard. It's an exact replica of the shape. It'll make a perfect routing fence / template. I stuck it down with strong double sided tape and popped it in a vice to make the stick strong.
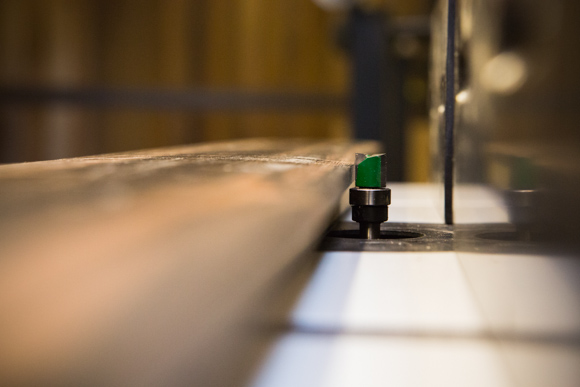
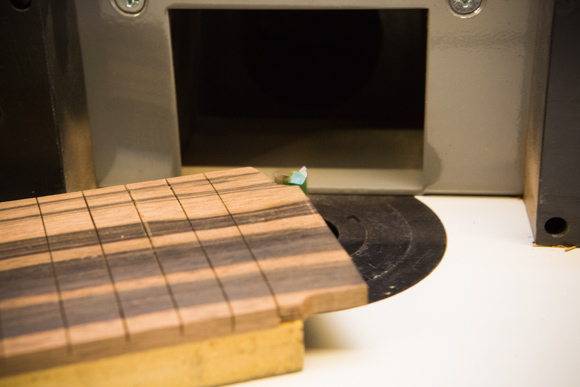
I used my trusty routed table, and fitted a template follower bit. I set the height of the cutter so that the blade would cut just the fingerboard but the bearing would follow the template. Once complete, the fingerboard will be exactly the same shape as the template.
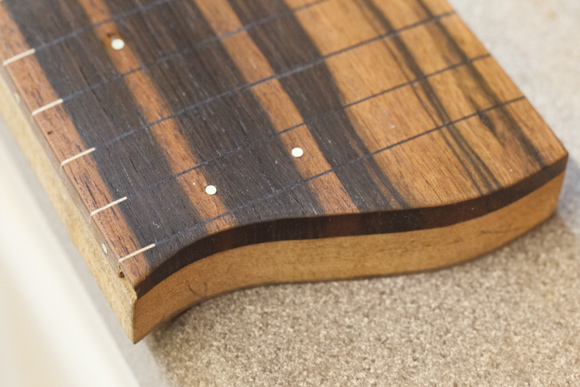
Even the tricky end scroll shape can be cut using the route table and template bit. This technique is great but care must be taken to not allow the cutter to splinter the wood or to take off too much material.
I'll leave the fingerboard attached to the template until after I've glued in the maple fret lines. I don't want to put pressure on the fingerboard and break it in it's weakened / slotted state.
I'm very pleased at how well this fingerboard has turned out. Considering how hard this wood is and how wide it is...it's the best 7 string fingerboard I've constructed yet!
Unfortunately, my Japanese fret saw needs a new blade and it's caused a few uneven fret slots. It's not too much of a problem but something I need to replace before I start another fret board. |
|
|
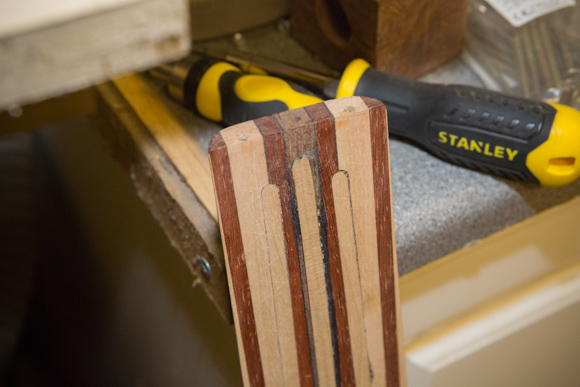
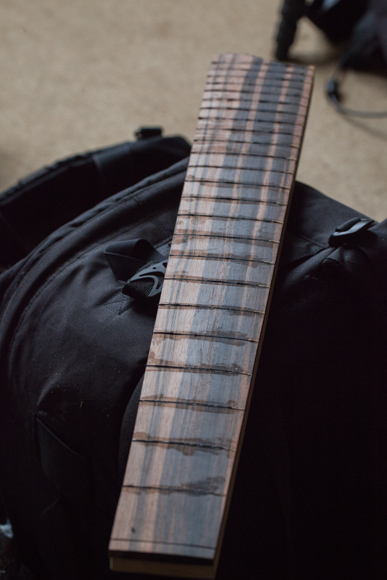
I left the fingerboard for a few weeks to help me decide what to fill the fret slots with. It needs to be right, functional and look good.
I really like the black lines I used on my 4 string fretless (with a similar fingerboard). But under less that ideal lighting, a lot of the fret lines just disappear and it's quite hard to see where I am on the fingerboard.
The original fingerboard used maple lines, and they really stood out well against the rosewood board.
So I decided on using both, a short maple 8mm edge highlight and the rest of the fret lines in black.
This has worked out well and really looks nice. I'm very pleased with the results.
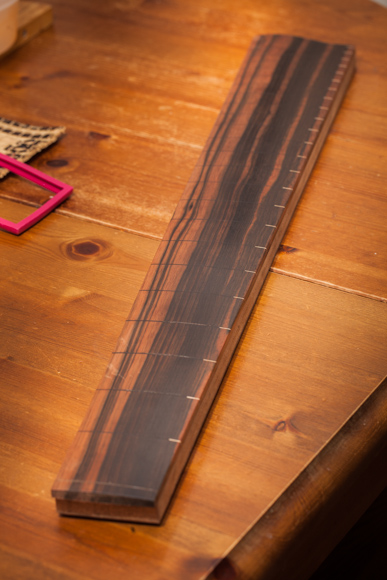
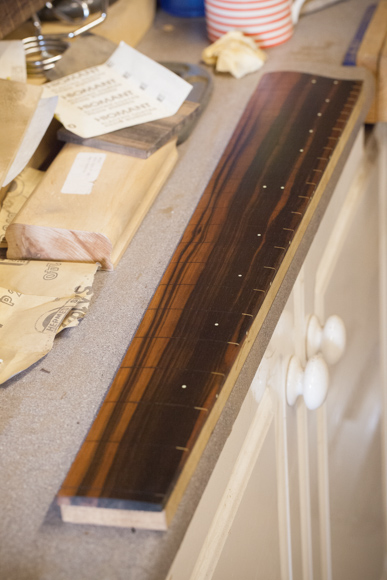
The next question was dot markers. Do I or don't I? I really don't care for front facing markers, especially the big old ugly trad style of giant dots. I like a more restrained and subtle approach. Side dots are a must, so I like to use the same markers (If I am going to fit front markers) on the side and front. I considered not fitting any front markers on this board. But when I went back to the original fingerboard, I had fitted LED small markers...So I placed 2.5mm markers in the same place on the new board too.
The LED's were a bit of a disaster on the original board and as much as they looked cool...and LED tech has also come on a LONG way since I fitted these...I really want this board to work well and after three boards...this one needs to work and not fail again.
So instead of LED's I bought a set of Luminay dots instead and fitted those. They work OK, but are not as bright as even the older LED's I used to use. But hey...they are better than nothing and under normal light...they look like whitle plastic dots.
They were very easy to work with and simple to install. But they are expensive for what they are and I would advise to buy more than you need.
|
|
|
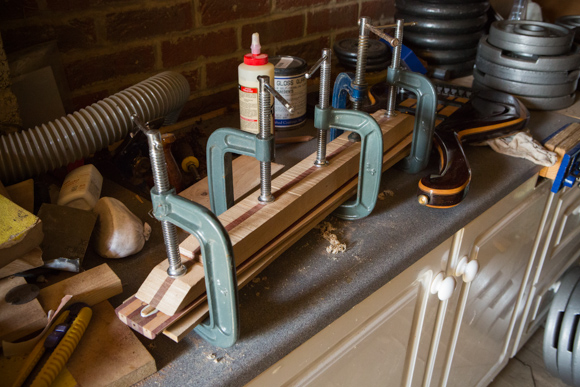
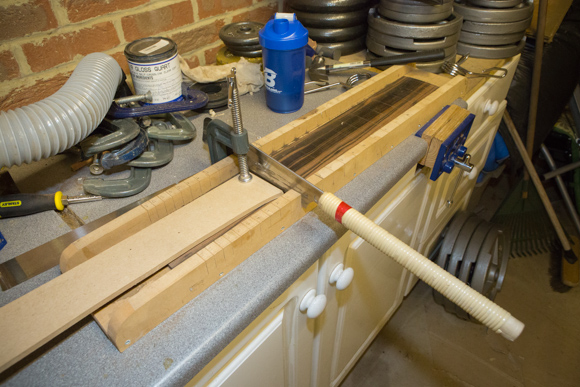
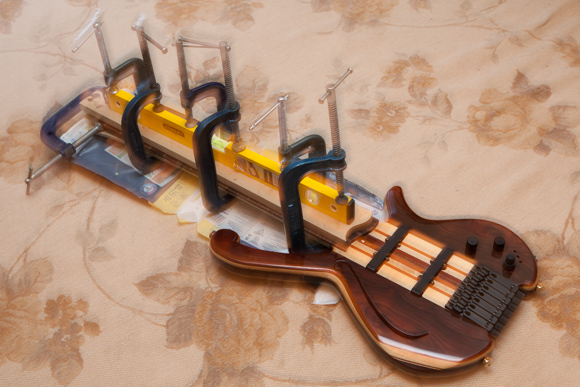
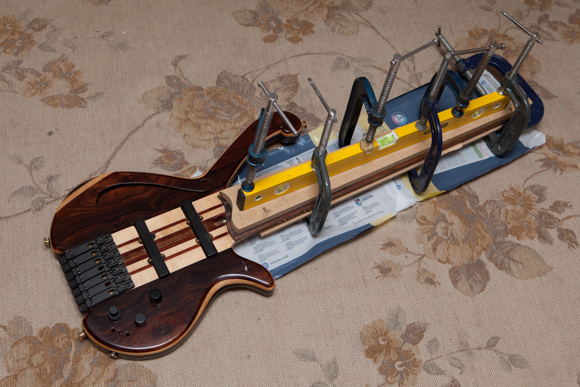
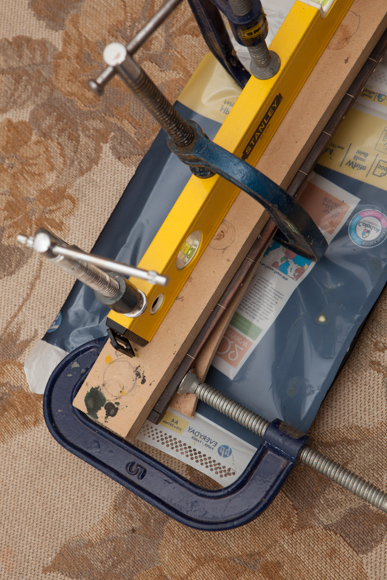
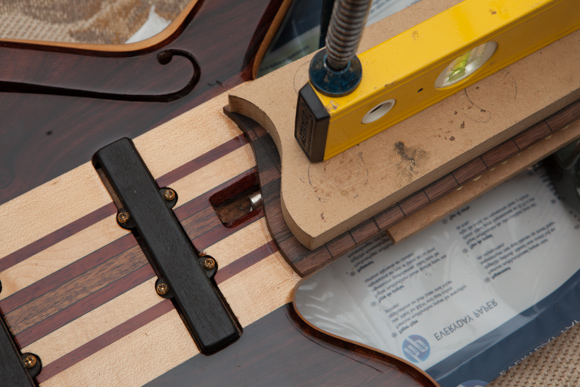
December 2015 The gluing of the fingerboard went well. But it's always stressful endeavor. A dry run...looks simple and easy. But once there is a layer of glue...everything starts to drift and slip. After the head ache of the 6 string board.
I now use a long straight edge to clamp against. So the clamps pull the neck straight. I think this a key approach to wide necked basses. otherwise the fingerboard glues and conforms to the neck...which might move or do something weird under the glue's moisture. It took me about an hour to get the clamps and fingerboard to set how I wanted them and even then, there was about 3mm of slippage. I forgot to use a nail tack to hold it in place.
There's a lot of glue involved in this stage and it'll take a few weeks for the moisture to stabilize and dry out fully. The joint is stable after about a day. But the water content with take longer to settle.
I used 7 clamps in total. With this neck I didn't need any more and it's worked out well. I oversized the fingerboard to allow for a bit of slippage and the movement is well with in that safety margin.
After removing the clamps, it's adhered very well and evenly. I think this is the best way to affix a wide fingerboard to a bass neck. Now that the fingerboard is dead straight to start with...finishing the fingerboard is going to be a lot easier...unlike the last bass I built...oh boy! That fingerboard needed a LOT of post work.
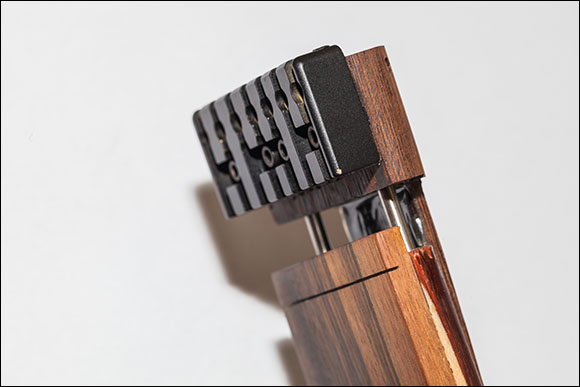
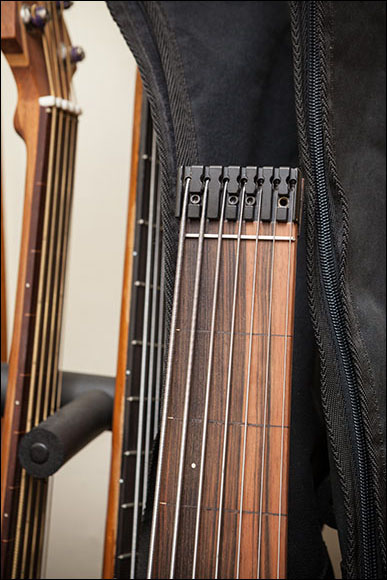
Next, I need to clean up the edges and look at how I affix the new head piece. It's a different design and requires a different attachment than the old one. This one is a better design and will allow me to use double ball strings as well as regular strings. When I built this bass, it was well ahead of it's time and probably the worlds first 7 string headless bass. But these days, I can buy the parts "off the shelf" from Hipshot!!! I guess that's market progress!
|
|
|
Progress has been slow of late. Christmas, My Son's birthday, my 45th Birthday...a trip to Brazil...I've been very busy. January 2016 The original headpiece was a custom made unit from David King in America. He machined it from a solid billet of brass and it's a great unit. At the time, it was my only option...this was after all, the world's first headless 7 string bass. He made it according to an extended design which he uses for his own headless system, which is why I went to him in the first place. It's a good design, but I implemented it slightly wrong. Firstly, I made the neck very very thin. At the time I was obsessed with making the neck profile as thing as possible (don't ask em why). Dave is a little more sensible and adds a more pronounced girth to his neck radius. Which gives a deeper angle between the three bolts and more material for the butt joints to hold against. The second mistake I made was that Dave's design uses the truss rod bolt for the center hole, which allows the truss rod adjustment to be done at the end cap end and allows a really strong join. The end cap effectively becomes bolted to the truss rod as well as the neck. For some reason...I insisted on fitting the truss rod the other way around...adjusting from the body end. This meant that the center hole had to be secured with just a wood screw and there wasn't a lot of depth left between the end of the truss rod and then end of the neck. This also weakened the union somewhat. IF I ever get around to making the other fretted twin to this bass...I will reuse this head piece and design the neck and truss rod accordingly! So, when I came to renovate this bass I turned to Hipshot...who now make a 7 string headless headpiece! But it's a very different design and requires fitting parallel to the fingerboard. So this means I needed to adda bit to the end of the finger board. I had a little piece from the end of the neck that I cut off to make the old headpiece fit (ironic that). So I drilled the new fitting holes for the head piece to affix to the neck extension and glued it into place using a Titebond epoxy resin. This glue claims to be "stronger that the wood itself". I strung up three strings and brought them to tension. It all looked good and this bass sounds magnificent btw. It's so clear and articulated. I plucked about three notes, there was a loud crack and the new neck extension ripped right off. The glue IS NOT STRONGER than the wood...I can attest! So this bass had to be put away in storage as my life had collapsed...and I was made nearly homeless. |
|
|
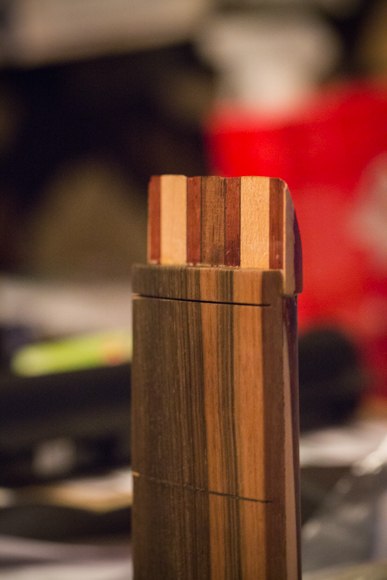
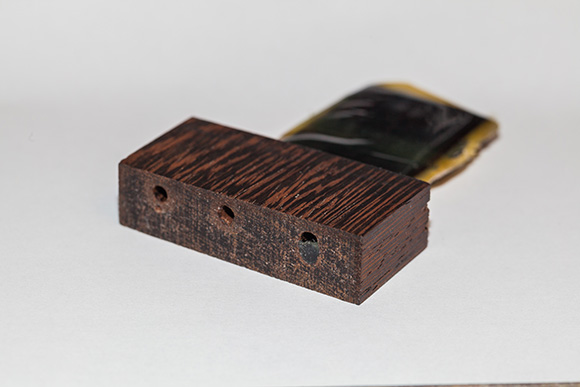
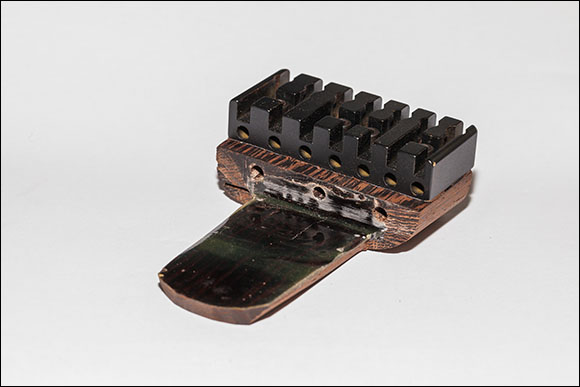
This is a close up of the neck extension, before it broke off. The new Hipshot 7 string head piece and it looks and functions very similar to Rob Green's design from Status Graphite. It's a design I like a lot. The pulling angles exerted on by the string and how they act upon the head piece's fixing is different. I need to develop an arrangement that will be more stable. I need to add some more material to the back of the neck. |
|
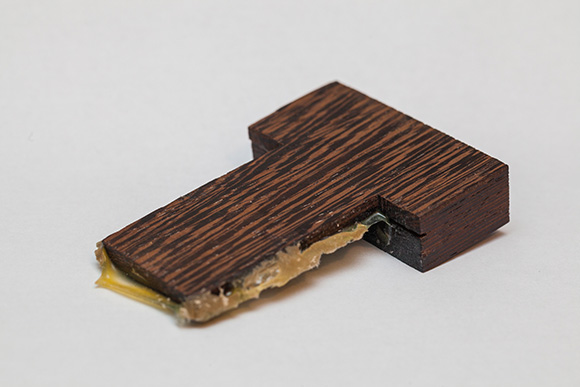
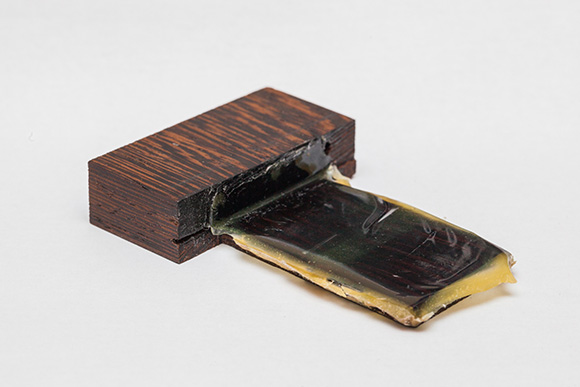
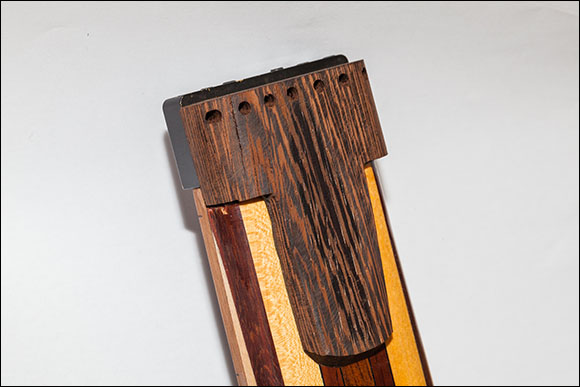
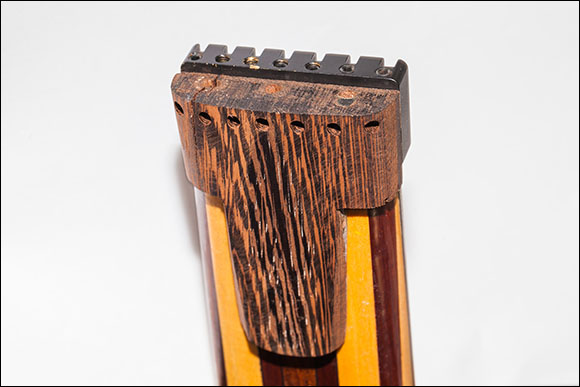
Here is a close up of the snapped off neck extension. So much for Titebond's claim if being stronger thant he wood itself! The old brass end cap / string retainer is in the background. The new one is still affixed to the snapped off neck extension.
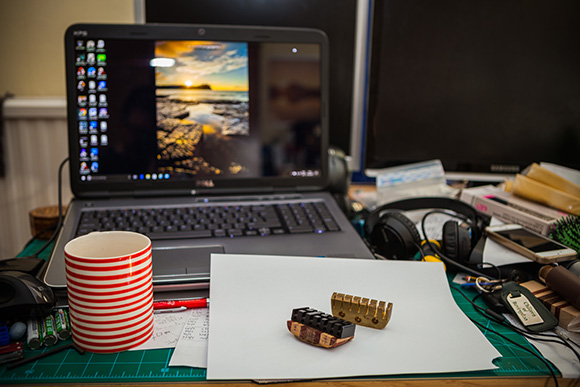
A nice mug of tea, google...laptop...camera and a bit of white paper! |
March 2017 So one year later and my life has settled a bit more and I have limited access to my tools and machinery again. I'm living back in Deal in Kent. I bought a pair of 4mm titanium rods for reinforcment. I've designed a far better neck extension block and this time it'll be made from wenge and may have a carbon fibre panel. I've also bought a 4mm hardwood dowl for the troubled centre hole. The design looks good on paper, but I think once I have it machined, I can see if it'll be up to the job. I also designed a 2nd unit which is even more ridgid, but this will need to be cast in Carbon Fibre and that'll take a lot of time, effort and money to develop. If the wenge / titanium reinforced design works, then this bass will be playable within a few weeks or so. |
|
I chose Wenge for this job as it it so hard and almost like bakerlite in it's density. It sands and saws really well...just don't try to hand plane it!
Opps...right hand hole is drilled too low
Re-drilled in the right spot...I just need to fill the old hole and re-drill again.
It's tough to machine a complex shape like this by hand and the saw marks are an unfortunate consequence of hand machining. In an ideal world I would have designed this in auto cad and then carved it out on a CNC milling machine. One day!
|
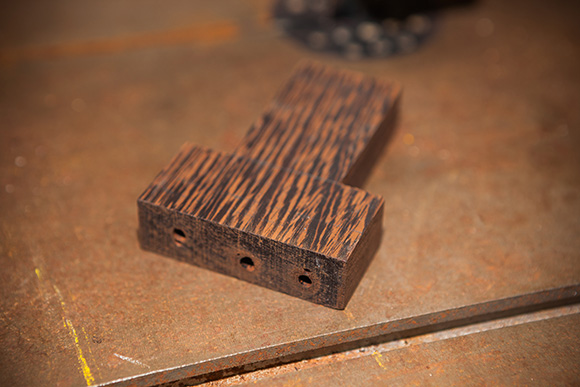
Firstly the design starts with a block of machined wenge. This was a section from a left over slab which I used for the body core. It's nice to reuse the same wood again. I have off cuts from all of the woods for all of teh basses that I've constructed.
I needed three 4mm holes drilled for the titanium re-inforcing rods which I drilled using my pillar drill.
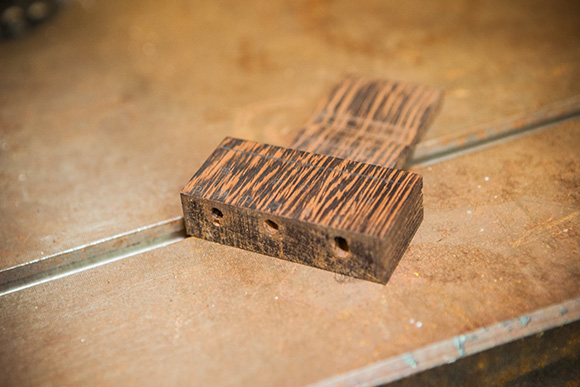
I made a mistake with the marking of one of the holes and I drilled it in the wrong place and was far too. So I re-drilled the hole. I then craften a dowl which I cut from the slab of wenge on my band saw and then sanded round and to the right size. I plugged the hole with the dowl and fixed it using a slow (but hard) epoxy resin. Which took 14 hours to fully cure. This mistake could then be re-drilled. This re-work took longer than the machining of the wenge block!
Then I cut a step in the rear of the block to accomodate the neck of the bass and provide a strong anchor to the head piece. I did this using my bandsaw and it was tricky due to the small size and weight of the block.
The step was left quite rough after the bandsawing. I took the worst of if off with 80 grit sand paper. This area isn't going to be seen and fits against the underside of the neck. So this is as far as I took it.
It's going to be covered in epoxy resin soon so that ti can take the exact form of the neck and so that it forms a great surface to attach to the neck.
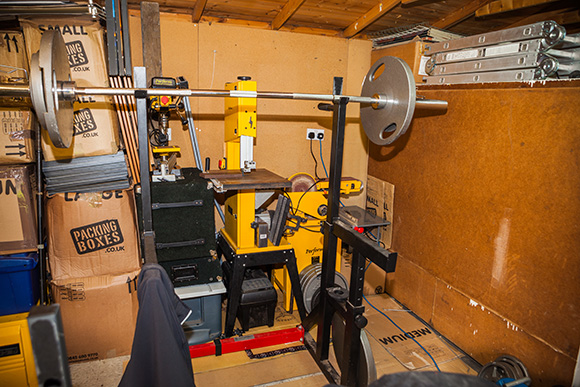
Here's an image of my make shift weights shed / workshop. There's not a lot of space and to get to anything...it usually involves a lot of moving stuff around. If I need to find a specific tool...I have to go rumaging around in boxes, hunting for stuff. I've moved home 4 times last year. |
|
|
I covered the underside of the step in epoxy resin and placed thin sheet of plastic over it and secured it to the neck in the correct place.
This is to allow the epoxy to take the form of the underside of the neck and create a tight union later. It would be nearly impossible to carve an exact profile of the neck into this wooden step.
You can see the wenge dowl fillet and epoxy in the hole to the right.
This resin is quite hard, but it'll need a further 8 hours to fully cure. Tomorrow I will file down the excess and neaten it all up. I'll also drill out the hole in the right place!
So, all I then need to do is drill the holes in the neck for the reinforcing rods, drill the holes for the head piece so that it can affix to the wenge neck extension. Then I can drill the string holes that the strings need. Then I can do the final shaping and carving and maybe the finishing.
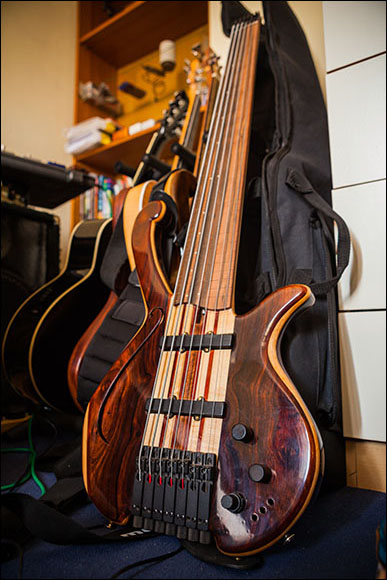
I can't wait to get this bass working again. It used to be my main fretless bass.
|
|
|
When I removed the unit from the bass, untaped it asn removed the plastic sheet from the epoxy it was 1/2 cured. It was hard to touch but I could easily dig a thumb nail into it.
Over night, it fully cured and is very hard. Araldite while is slow but is certainly the strongest epoxy I've used. It's a pity it's not clear.
I sanded the excess off and shaped the block unsing my sanding machine. It makes light work of this type of thing. Wenge doesn't plane well...but it saws and sands like a dream. It's an excellent wood to prototype in.
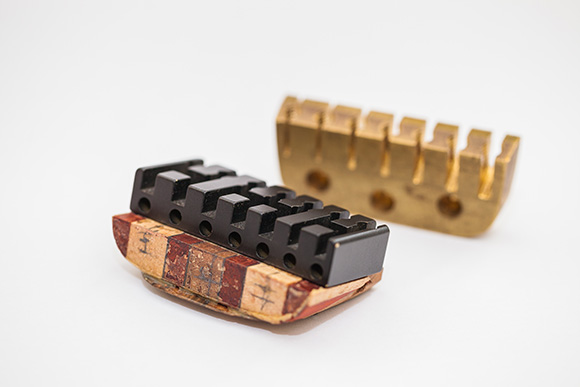
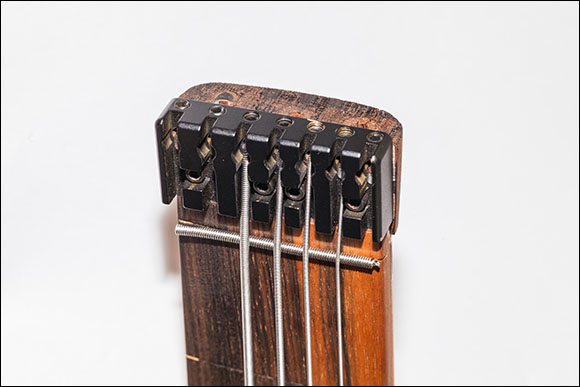
I re-drilled the repaired hole, and drilled out the fixing holes for the head piece and the holes for the strings to pass though.
I bolted it all together and it's looking really promising!
The titanium rods are simply push fitted / tapped into the 4mm holes in the neck and then the neck extention was placed over them and carefully tapped in place. |
|
Spot the two 4mm titanium rods!
|
I'm very suprised how
well this has worked. I was thinking that I would need to epoxy the
neck extension to the neck, but it's a lot more stable than I expected.
A slight crack opened in the wenge neck extension, which I suspect is due to some tension from one of the head cap fitting screws screwing in close to one of the titanium rods, which has pushed the screw out of it's hole and causing the wood to go with it. When I next dissasemble, I'll fill the crack with epoxy resin to seal it. It seems stable and hasn't otten any worse under string tension
Yes...I strug her up with 4 spare strings and tuned them up...it's such a nice sounding bass.
I looked through my stock of bass strings and cobbled a 6 string set of round wounds together. The 7th string at the moment is a doubled 0.25 as the high C. I'll put a string order in soon for a new 6 string set and an extra few 0.20 guage strings for the high F
I'll need a few spares because it's a really thin string, it's under a lot of tension and it's a very long scale length for such a thin string...it breaks really easily. |
|
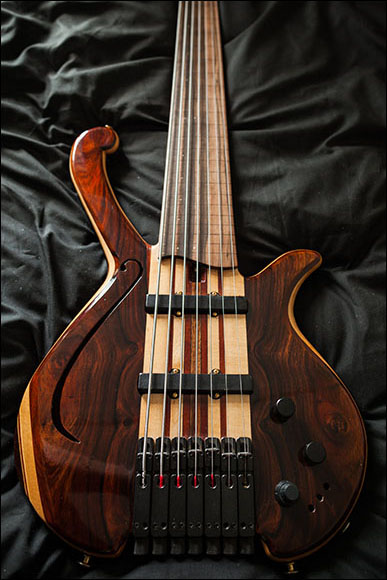
It's tough to photograph a highly polished surface when using a flash gun!
The high F has always been a problem on this bass. I used a 0.015 guage round wound string for a while but it snapped in about a week. I tried a 0.20 which lasted longer but dind't sound too nice. It had no sustain and sounded chocked. I tried a 0.025 ( high C string) but that snapped under tension before it made the right tuning. But recently I was advised by a chap on a forum (a Chapman stick player) to try a solid core steel string instead, a 0.016 guage. Well, the Chapman strings aren't available in singles and they are expensive. I found a company in the USA who could supply a single string for about £8, but they wanted £35 to ship it to the UK...that's a lot for an experiment! So I dropped an email to www.Stringsdirect.co.uk and asked them about the length of Rotosound's solid Steel 0.016 max string length. Well...I bought 3 and they work great! Except I have to hand wind a Bass string retainer at one end! But it soulds really nice and plays just like the other strings. It has the same string volume as the other strings and it doesn't sound choked anymore. Now this bass plays and sounds like a proper 7 string and not like a 6+1 string.
I really like the tone of this bass. But a re-think of the controls and wiring is necessary. I might replace the jack socket with a stereo switch craft type unit. This will allow me to leave the battery in the bass over night (pull the cord out and it'll dissengage the active circuit if it's wireed right) and it'll give me a little bit more room in the cavity for some switches. I drilled out three holes a long time ago and then didn't use them due to the jack casing obscuring them. Last year I moved the jack hole and If I change the type of connector, I can liberate some extra space in there, maybe enough to fit a bank of three switches. I could opt for a stacked Vol / Vol pot, a mid pot (which would require new electronics) and keep the existing Bass / Treble stacked pot. Then I'd need a 2 way active passive switch, a parallel / Series / Phase 3 way switch and a mid control frequency 3 way switch. I think this might be a project for later in the year though, when I'm back working / earning again
|
I spent about an hour fitting the strings and setting up the action and pick up heights. I fitted a zero fret and I'm really impressed with the tone, playability and the new fingerboard. But... there's slight ramp at the body end of the fingerboard which is choking the strings in the upper registers. I've also for the action way high to compensate at the moment. So I'll need to sand down the finger board by about 1.5mm. I'll reset up the action and then think about doing some improvements to the area that sits under the bridge / tuner units. I angled them back for some reason and this really complicates adjusting the string heights.
A small crack appeared in the neck extrension block, after inspection I found that one of the end cap's fixing screw holes clashed with one of the titanium rods...so I glued the crack with wood glue, then removed fixing screw to close the gap. Which worked well. Then I left it to set for 24hrs and redrilled the screw hole so it missed the rod.
The blend pot was doing something odd, if I blended both PU's together I got no output. So I opened up the rear cavity and took a look. Inside was a bit of a mess. It harks back to my earlier days of bodge it and close the cover. I resoldered the output and ground cables to the pan pot. Now the blend is doing something even stanger. If I pan to the left, I get what sounds like series, mixed seems to be series out of phase and pan to the right seems to be parallel. Very odd and will need further investigaions to find out what's occuring. But I'll need the pickup wiring diagram and instruction before I can begin to unpick what is going on becuase it's not a fault with the rest of the electrics / electronics/ They are all wired correctly. So I susepct that something is oddly wired with the Pickups. They are noise cancelling jazz pickups, so there's more than one coil per shell. I also shielded the underside of the cavity cover with sticky backed copper sheet and put an earth tb on the cover. This has really improved the shielding a lot. |